I see a lot of the same mistakes when teaching new (and even more experienced) shooters. The three most common mistakes are flinching, lack of follow-through, and grip adjustments between shots. If you find yourself making any of these mistakes, try some of the simple fixes below or, if you want more help, contact us to schedule a private training session.
Flinching
Usually, flinching is easily diagnosed by your targets. If you are right-handed and tend to pu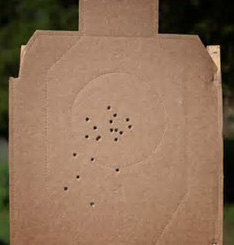 t a decent amount of shots a little low and left of the bulls-eye (a little low right for left-handed shooters), chances are you are flinching. There are many possible reasons why you flinch before the breaking the shot – I’ll address the two I see most often.
The first culprit is your hands – they tighten in anticipation for the shot going off. Just before you break the shot, your hands squeeze a bit harder and cause the muzzle to dip, usually low-left for righties. The easiest way to solve this is to simply grip the gun as tightly as possible from the very start and maintain that same consistent grip throughout, even into your follow-through. Your grip should be hard enough to be just shy of quivering. Most importantly, you must be able to independently press the trigger without changing the rest of your grip.
The second most likely possibility is that you are pushing your gun forward and down at the very last second – a more literal “flinch” – to prepare yourself for the recoil. Even if you have a solid grip, you know the gun will bang/recoil so you compensate by flinching/pushing down at the last minute. In this scenario, you probably need some more work on your trigger press. Use a smooth press while keeping the sights perfectly aligned. Intense focus on the sights will help you forget about the recoil and each shot should break as a surprise. As many masters are known to say…it’s simple, it just ain’t easy.
Some drills you can do to help reduce your flinching at the range:
Ball-and-Dummy Drill: For semi-automatics, you can purchase dummy rounds, sometimes called snap-caps. These are plastic replicas of your caliber of cartridge. You can randomly load them in your magazines and then shuffle 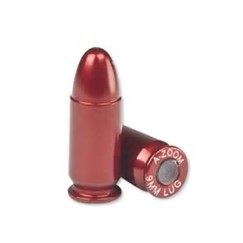 the mags so you don’t know when a dummy round will occur. When a dummy round is in the chamber and you press the trigger, you will very clearly see that you are flinching because your gun will drastically move even though it did not fire.
Seeing this happen will help you diagnose your flinch, but to improve, you’ll need to concentrate on your grip, sights, and trigger press and continue this drill until the gun remains still when you get that click rather than a bang.
Sometimes we find it helpful to stop firing live rounds all together and do some dry-fire practice (see below) right there on the firing line.
If you shoot a revolver, you can also purchase snap-caps or just leave one or more of the chambers empty.
Dry-Fire: Dry-firing means practicing trigger presses with NO AMMUNITION. It is easiest with no magazine in your firearm. Rack the slide and bring your gun on to a target and practice slow and smooth trigger presses while holding your sights as still as possible. You will have to rack the slide after every trigger press. This can also be done with a penny set on the front sight or top of the slide. The goal is to keep the penny in place while pressing the trigger. Here is my short video explaining The Penny Drill.
Remember, the key to placing accurate shots is keeping your sights perfectly aligned while you press the trigger.
Follow-Through
A second mistake I regularly see with shooters is a complete lack of follow-through. Follow-through is maintaining all the fundamentals of grip and stance as you get your sights realigned on target after breaking a shot. Most people want to see where they hit so they relax their grip, lower their firearm, and/or peek over their gun. These are horrible habits to develop, but are an easy fix.
After breaking the shot you should be focusing on your sights, with the target in the background. Keep the gun at eye level. Maintain your grip and stance. Eventually, with practice, you will see your shots more easily. One way to practice this is to place your target at a very close distance like 3 yards. At such a close distance, you need not worry about if the shots hit the paper (I hope!) and you can just concentrate on the sights.
If you need or want to see your shots more clearly downrange, try using reactive targets that use colors to indicate where you hit.
Grip Adjustment
The third most common mistake we see all the time is grip adjustment. I see some shooters adjust their grip after every shot! This inconsistency will wreak havoc on your accuracy and can be caused by poor fundamentals or possibly a poor fitting handgun. If you are adjusting your grip often, there are a few things to try.
 Start by reviewing proper handgun grip fundamentals. I did a short video on proper grip here that will only take a few minutes of your time. Grip is vital to consistent accurate shooting, so make sure you get it right.
Massad Ayoob teaches students to use a hard crush grip. Try gripping the firearm as hard as you can and mentally check that you have maintained that grip after each shot.
We sometimes have students use a push-pull method to keep their grip tight. For righties, pushing out with your right arm and hand and pulling back against that force with your left increases stability.
Lastly, if your handgun is just too uncomfortable maybe you should consider a firearm of different size and/or caliber, an aftermarket grip “sleeve”, or even consult a professional gunsmith to permanently modify the grip to make it more comfortable.